Hi guys. This is a quick one
People have asked me how we put the honey that we have harvested from our pails into jars.
After the spinning we let the honey run through 2 stainless sieves directly into plastic pails where we usually keep it until we put it into jars (or ferment it into mead). We generally do not do any other treatments (like creaming it) to our honey, as this would require more equipment which we do not have.
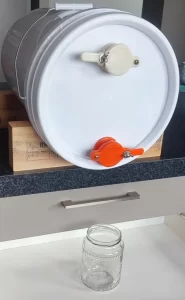
All the pails we use for storage of our honey are of the same type, meaning that the lids are all the same. What is also very important is that the lids we use on our pails have a tight and firm fit and do not come off easily. We found this to be true for both the white polypails that we use as well as the Mitre 10 Buckets.
What we have done is put 2 holes into one lid and attached 2 of plastic honey gates as per the picture below:
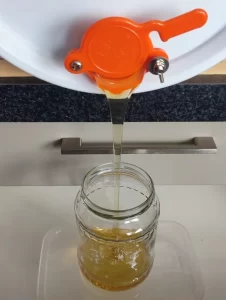
Theoretically one honey gate would be enough, but the honey emptying out of the pail would create a vacuum. The top gate simply acts as ventilation hole to let air go back into the pail. These gates can be obtained pretty much everywhere (Trademe, Aliexpress, various beekeeping equipment suppliers) for very cheap.
The gates we used require a 50mm hole and what we found worked best is to use a round metal piece (smaller than the hole size) that was heated up with a torch to melt through the plastic (use pliers to hold the metal piece) and then gradually increase the hole in size till the gate fits snuggly. A hole saw might work too.
Now all we need to do is to put our “gated” lid onto the pail of honey that we want to put into jars. Make sure the lid has been put on firmly, if it came off during the process you would create a huge mess.
Next you need 2 blocks of wood that have a curved cut out so the pail will fit into them. The curvature of the cut outs needs to match the curvature of the pail you are using, but does not need to be ultra-precise. A jigsaw will work perfectly fine for this. These just ensure the pail resting stable while being tilted horizontal as per the above picture.
Next position a jar below the honey gate and slowly open it, You will find that opening and closing the honey gate will give you very good control of the flow rate, and with a bit of exercise you will be able to empty the pail into jars very fast.
Note that in our case our wooden blocks were not tall enough so we used a kitchen drawer as a lowered platform for the jars. We also added a plastic container to catch any accidental spillages. Keep a wet cloth and plenty of empty jars nearby.
As the pail empties you will want to lift the backside of the pail up further to help with emptying it. You can do this by stacking another wooden block under the back side.
Of course, you will eventually end up with a pail that has been nearly emptied but a small amount of honey always remains, that you will have to scrape out. For us a soft plastic/rubber spatula works best for doing this.
One issue you might have, is crystallization. If your honey is a giant hard block you obviously can’t put it into jars the way we described above. However, heating it to slightly below 40 degrees Celsius for 24 hours will usually reliquefy it. For this we use a water bath heater with a thermostat that can fit an entire (closed) pail. It is important you keep the temperature below 40 degrees because at higher temperatures the healthy enzymes that are in the honey could be damaged. Those water bath heaters are not cheap however, so my advice would be to put your honey into jars as soon as possible and before it crystallizes in the pail.